This blog discusses the basic requirements and easy steps you need to know before the process of ‘how to connect Brother printer on Windows‘. The problem is, with so many options, it can be overwhelming to figure out where to begin and which option to use.
Setting up your printer on Windows is easy, whether you’re using Windows 10 or 11. To learn how to set up a printer on a computer, you should keep reading this blog. It will surely provide you with clear instructions and guidance through a step-by-step process to ensure your printer runs quickly.
Most Brother printers offer direct Wi-Fi, allowing you to set up a wireless connection between your printer and device without using a router or access point. This can make printing, scanning, and copying items from your wireless phone, tablet, or other device easy.
Gather All the Essentials
Before you begin, make sure you have the following on hand :
- If connecting via USB, a standard USB cable (type A and type B) is needed
- If connecting wirelessly, note your Wi-Fi network name and password.
- The printer’s model number is usually located on the back or bottom of the printer.
Note: The Brother printer doesn’t include a USB cable, so you need to buy one first. Then, you can use it to connect the wired printer to your computer.
Choose Your Connection
Connect your printer to a Windows 10/11 operating system with USB or a wireless network.
- USB connection – This is one of the simplest and most reliable methods, ideal for situations where consistent network access is not crucial.
- Wireless connection – This option offers more flexibility and lets you print from any device connected to your Wi-Fi network.
However, it requires a stable Wi-Fi connection and involves additional setup steps.
How to Connect Brother Printer on Windows With USB
Follow the following steps to connect the printer to a Windows computer easily :
- Attach the USB cable to your printer machine and the device to ensure both are powered on.
- Attach one USB cable’s end to the USB port on your PC and the other to your printer’s USB port.
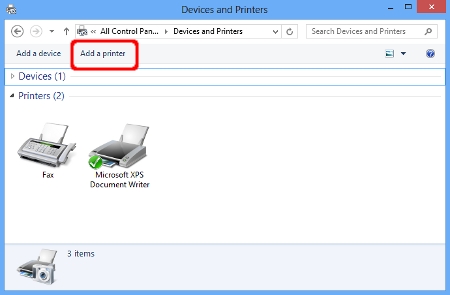
- Go to “Settings” > “Bluetooth and devices” > “Printers & scanners.”
- Clickon “Add a printer.”
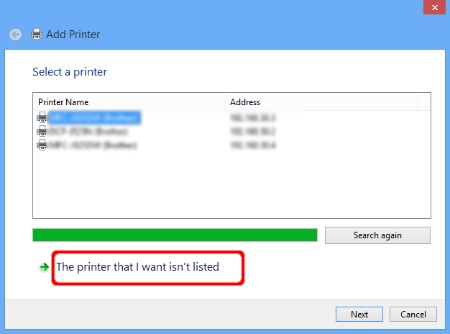
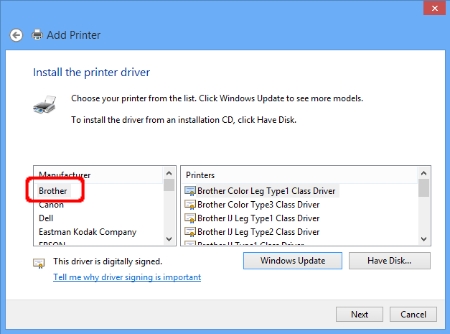
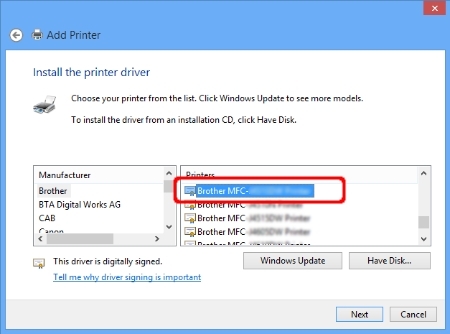
- Choose your printer model from the list, as Windows should automatically detect your printer. Click Next.
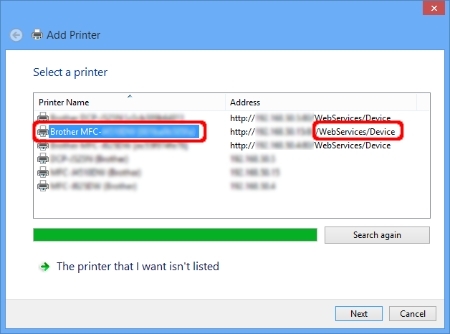
- If your printer isn’t listed, download the necessary drivers from the Brother website, specifying your printer model and operating system to ensure compatibility.
- If prompted, choose “Install driver automatically.”
- Follow any on-screen steps, as Windows will guide you through the driver installation. This might involve accepting license agreements and choosing installation locations.
Once the installation is complete, your printer will be listed in the “Printers & scanners” settings. Now, you can test your printer by printing a test page.
How to Connect Brother Printer on Windows Wirelessly
Here are the simple steps to add your printer to your Windows PC to a wireless network:
- To resolve the issue and be able to print, follow the recommendations below:
- Turn on your printer using the power button, and plug the power cord into your printer and a power outlet.
- Locate the Wi-Fi setup menu on your printer and refer to your user manual or printer display for specific instructions on accessing the Wi-Fi setup menu, which typically involves pressing a dedicated button or navigating through the printer’s menu options.
- Connect your printer to your Wi-Fi network. Next, you will need to enter your Wi-Fi network name and password.
- Now, your printer will try to add to Wi-Fi. This might take a few moments.
- Once connected, your printer should display a confirmation message. You can also check the printer’s network settings via the printer’s menu or Brother control center software to confirm the successful connection.
- Return to your Windows computer and open “Printers & scanners” settings.
- Click “Add a device” and choose Add a “Printer or Scanner.”
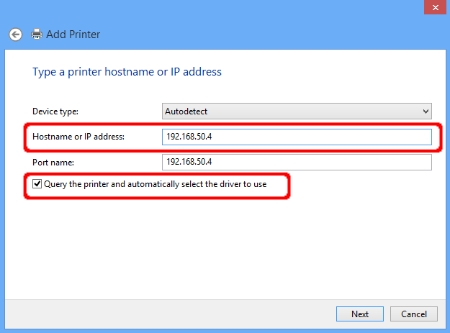
- Type in your printer’s IP address in the “Hostname or IP address” field.
- Check the “Query the printer and select the driver” option.” This will prompt Windows to download automatically
- Install the appropriate driver for your printer.
12. Select the model name and click Next.
Follow any additional on-screen instructions and complete the setup process.
Take a Print Test
Once your printer is set, a test page is recommended.
- Open any document or image you want to print.
- After that, select the “Print” option.
- From the available list of printer options, choose your printer name.
- If needed, adjust print settings (for example, paper size and print quality).
- Click “Print” to initiate the printing process.
- If you can print successfully, your printer is properly set up.
- Click Finish.
Frequently Asked Questions
Why can’t I print using my Brother printer on a wireless network?
Before printing, make sure about the instructions given below:
- Make sure your printer is turned on and ready to use.
- Ensure your printer’s screen displays no errors like “paper jams” or “ink/toner empty,” which could prevent printing.
- Make sure your printer is set as the default printer.
How do I get my Brother printer to recognize my computer?
To get recognized by your computer, ensure the following instructions:
- Double-check all the cables to see if they’re securely connected or not.
- Make sure you have the latest drivers installed. If you have not installed them, download them from the Brother website.
- Check your printer and the PC are added to the same wireless network.
- Verify your router or hub’s link LED to ensure it works without any problems. If the link LED turns on or blinks, the network devices and connection cables will definitely work properly.
How do I find Brother printer’s IP address?
To find a printer’s IP address, you can use the printer’s control panel.
- Press the Menu or Settings.
- Navigate to the WLAN tab (using the ▲/▼ arrows, and then press the OK button).
- Press ▲ and select WLAN Status, and then the screen will display your network connection settings.
- Select TCP/ IP or the address listed on the third line.